
 By
Walk around almost any two-story beach house near the Delaware shore and you will find spots where a lower roof runs straight into a taller wall. A garage roof tucked against the main house. A porch roof butting into the second floor. A dormer cheek rising out of the shingles. Each of those lines looks harmless from the yard, yet home inspectors routinely point to roof-to-wall intersections as one of the most common sources of hidden water damage in houses of every age.
The reason is simple enough. Rain that lands on a roof wants to run downhill, and at these joints it runs alongside a wall made of a completely different material, often installed by a completely different crew. When roofing and siding are handled as one connected job, as homeowners around Bethany Beach and Millville tend to find with Ocean View Roofing and Renovations, the seam gets treated as a single detail rather than two half-finished ones. When they are not, water finds the gap between them, and it rarely announces itself right away.
The Seam You Never Notice From the Driveway
A roof-to-wall joint has no single piece that seals it. It works more like a stack of overlapping layers, each one shedding water onto the layer below. Roof underlayment laps a few inches up the wall. Metal flashing sits over that. House wrap comes down over the metal. Siding finishes the job, held slightly above the shingles so it does not wick moisture.
Remove or reverse any of those layers and the stack starts guiding water inward instead of outward. That is why a joint can look tidy from the ground and still be soaking the sheathing behind it every time a storm blows through.
Little Metal Shingles With a Big Job
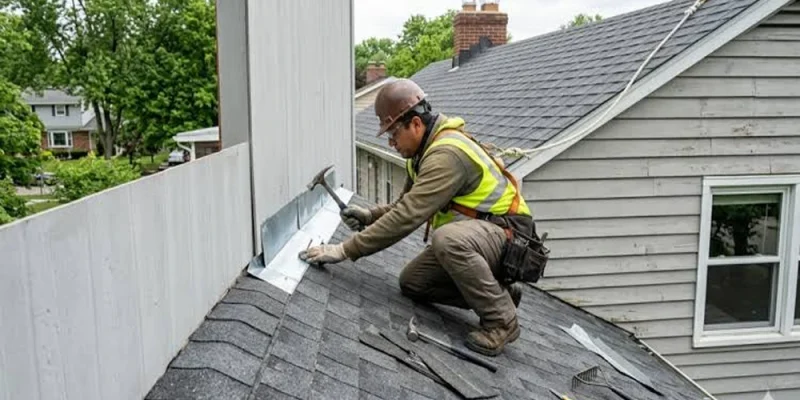
Along a sloped sidewall, the key piece is step flashing. These are small bent squares of metal, one woven in with each course of shingles, so every piece overlaps the one below it like a fish scale. One leg lies on the roof deck under the shingle, and the other runs up the wall behind the siding.
Inspection guidance from InterNACHI notes that each piece should reach at least four inches up the wall and four inches onto the roof, with shingles laid over the roof leg. Narrow pieces, missing pieces, or one long strip of metal nailed flat against the wall all defeat the purpose. A continuous strip on a shingle roof is especially troublesome, since water can ride down its length and dump behind the shingles at the bottom.
The Small Bent Piece at the Bottom
At the lowest point of a sidewall, where the roof edge ends and the wall keeps going, there is a piece many older houses simply never got. Kickout flashing is a short diverter that juts out from the wall and pushes the full flow of runoff into the gutter.
Without it, every drop collected along that sidewall slides off the last step flashing and pours straight against the siding, often behind the end of the gutter. The telltale result is a triangle of rot, stained trim or soft sheathing below that corner. On homes with vinyl siding the damage can stay hidden for years, because the vinyl itself looks perfectly fine while the wood behind it breaks down.
Chimneys, Dormers and Walls That Face Uphill
Not every intersection runs along the slope. Some walls face the roof head on, like the front of a dormer or the uphill side of a chimney, and those need their own approach.
- A headwall, where shingles meet a wall across the slope, takes one continuous apron flashing bent over the top course and tucked under the house wrap above.
- A masonry chimney needs two layers working together, base flashing tied into the roofing and counterflashing set into the mortar joints and lapped over the base.
- The uphill side of a wide chimney benefits from a small peaked cricket that splits the water and keeps it from pooling against the brick.
Sealant smeared along the top edge of chimney flashing is a common shortcut and an equally common failure point. Mortar shifts, the sealant dries out, and the joint opens again within a few seasons.
Salt Air and Sideways Rain Change the Math
Coastal Sussex County puts extra stress on these joints. Nor’easters and tropical systems push rain sideways rather than straight down, forcing water uphill under laps that would shed a gentle shower without trouble. Long summer stretches of sun bake sealants and the rubber collars around vent pipes. Salt carried on the breeze speeds up corrosion, especially where cheaper galvanized steel was used or where two different metals touch.
For houses within a mile or two of the water, many builders lean toward aluminum or copper flashing with corrosion-resistant fasteners, and they pay closer attention to how house wrap laps over the top of every metal leg. A detail that might hold up for decades inland can give out far sooner on a rental near the dunes that takes the full force of every coastal storm.
Clues That Show Up Inside and Out
Leaks at these joints tend to travel before they appear, so a stain is rarely sitting directly under the problem. Still, certain signs point strongly toward a wall intersection rather than the open field of the roof.
Inside the house, watch for ceiling stains along an exterior wall below a lower roof, paint bubbling near the corner of a room under a dormer, or swollen baseboards on a first floor wall beneath a porch roof. A musty smell in a closet that backs onto a garage roof deserves attention as well. Outside, look for siding that is warped or discolored at a corner, gutters that end without any diverter, thick caulk lines running along the shingles, and dark staining in a narrow strip beside a sidewall.
Why a Tube of Caulk Rarely Settles It
Because the flashing lives behind the siding and under the shingles, a proper repair means opening both. Siding comes off along the joint, a few courses of shingles are lifted, the old metal is pulled, and any soft sheathing is cut out and replaced. The layers then go back in the right order with fresh step flashing, a kickout at the bottom and house wrap lapped correctly over everything.
That is a bigger job than most people expect for what looks like a small stain, which is exactly why caulk becomes so tempting. It can buy a little time, but it treats the joint as something to seal shut, when the whole system was designed to let water drain out. Sealed joints often trap moisture behind them and make the rot worse.
Reroofs, New Siding and Additions Are the Time to Get It Right
The best moment to fix a roof-to-wall joint is when one of its neighbors is already being replaced. During a reroof, crews sometimes reuse old step flashing rather than disturb the siding, which leaves tired, corroded metal hiding under brand new shingles. During a siding project, installers may cut the new cladding tight to the roof and lean on sealant. Either shortcut can undo much of the value of the new work.
Additions and renovations create fresh intersections too. A sunroom, a raised porch roof or an extra dormer adds joints that have to be detailed from scratch. Asking how each one will be flashed, and who is responsible for the layers where roof and wall meet, is one of the most useful questions to raise before any work begins.
A Joint Worth a Closer Look
Most homeowners never think about where their roof meets their walls until a stain shows up on a ceiling. A slow walk around the house after a heavy rain, pausing at every spot where shingles meet siding, reveals a lot about how well those joints were built. If each sidewall ends in a kickout, the siding sits a little above the shingles and the trim below the corners feels solid, that seam is probably doing its job. If not, rebuilding the detail now costs far less than replacing the wall it has been soaking year after year.






Comments